In the dynamic world of web development, ensuring the security of your applications is paramount. One powerful tool to protect your React application from spam and malicious activities is Google’s ReCAPTCHA. In this blog post, we’ll walk you through the process of integrating ReCAPTCHA into your React application, step by step.
Why ReCAPTCHA?
ReCAPTCHA is a widely used and trusted service provided by Google, designed to distinguish between human and automated bots. By implementing ReCAPTCHA, you add an extra layer of security to your application, safeguarding it against spam, fraud, and other malicious activities.
Prerequisites:
Before we dive into the implementation, make sure you have the following:
- A Google account to access the reCAPTCHA API.
- A React application set up using a tool like Create React App.
Setting up a React Application
Using the create-react-app package, generate a new react application on your machine by running the command:
npx create-react-app demo_appNext, create a mock sign-in page with a form by updating the App component:
import React from "react"
import "./App.css"

function App() {
  return (
    <form>
      <input id='username' name='username' placeholder="Username" />
      <input type="password" id='password' name='password' placeholder="Password" />
      <button>Login</button>
    </form>
  )
}

export default App;
Then rewrite the ./App.css file to make the application a little bit pleasing to the eyes:
body {
  display: flex;
  justify-content: center;
  align-items: center;
  height: 100vh;
}

form {
  width: 300px;
  display: flex;
  flex-direction: column;
}

input,
button {
  text-align: center;
  height: 50px;
  margin: 15px 0;
  border: 1px solid #000;
}

button {
  background-color: #187efadf;
  color: #fff;
  cursor: pointer;
}

button:disabled {
  background: #a5a5a5;
  cursor: not-allowed;
}
Then start the application server by running the command via your command line:
npm startYou should have a running application at http://localhost:3000/ as such:

Generating reCAPTCHA Secret Keys
There are three current versions of Google’s reCAPTCHA:
- reCAPTCHA v2
- reCAPTCHA v3
- reCAPTCHA Enterprises
For the purpose of this article, we are making use of the reCAPTCHA v2 which has the famous “I’m not a robot” checkbox.
First, you need to get a Client Key from the Google reCAPTCHA admin console by clicking here, which leads to this page below:
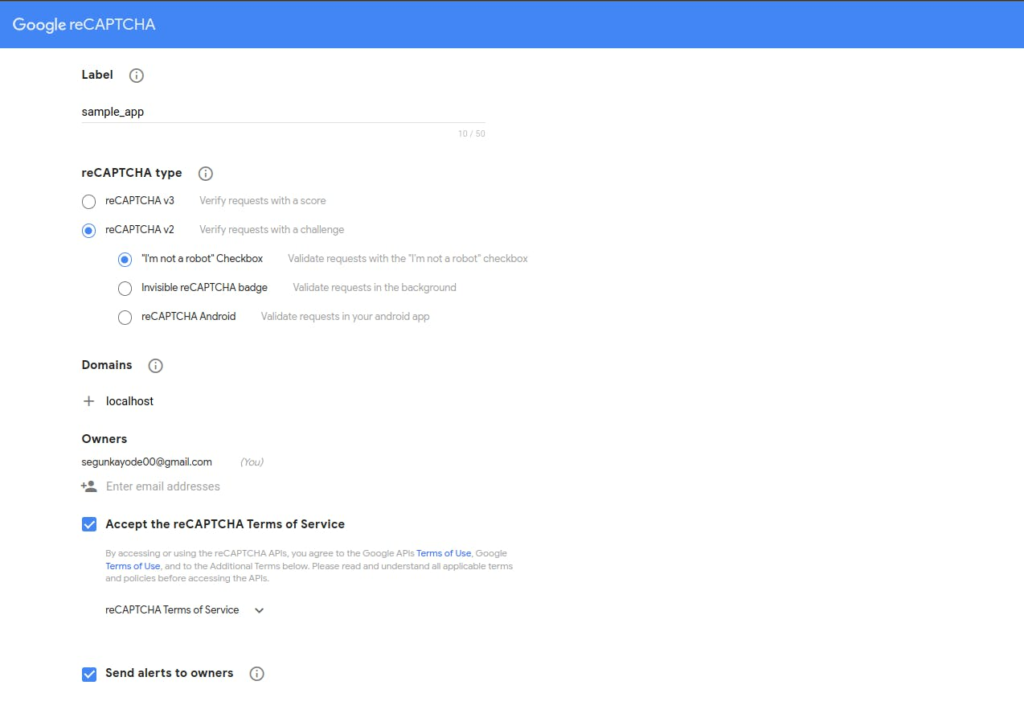
Enter the label to be able to identify the different projects or sites on Google reCAPTCHA. Select reCAPTCHA v2 under the reCAPTCHA type option then the ”I’m not a robot” Checkbox option.
The Domains option allows you to configure the number of domains (including subdomains) that has access to the registration. Since our react application is in development, you will add “localhost” in the Domain option.
Accept the reCAPTCHA terms of service then click the submit button to generate some keys that will be used later in this article.
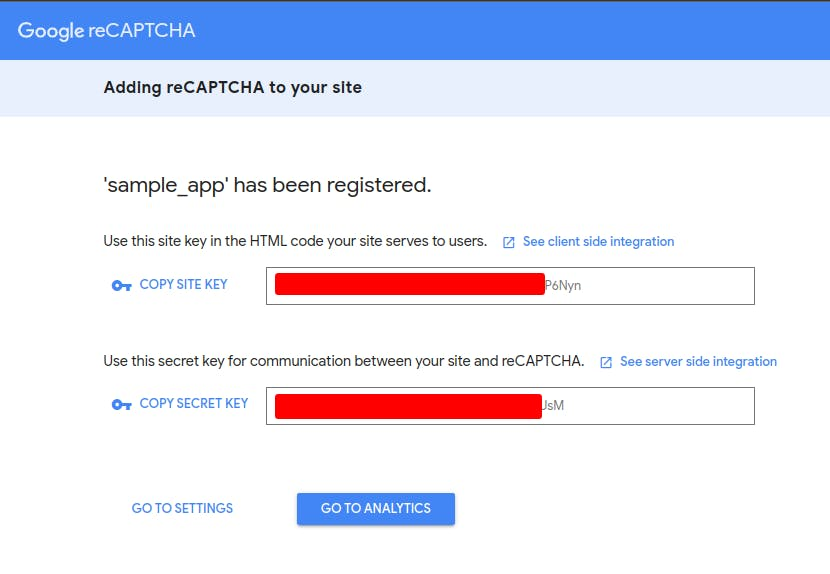
To use the site key as an embedded environment variable in your react application, create a .env file in the root directory of your application. Copy the code below into the .env file and replace the site key with the one you generated from the Admin Console.
REACT_APP_RECAPTCHA_SITE_KEY=your_site_keyIntegrate ReCAPTCHA into Your React Component
To integrate reCAPTCHA into your React application, we are making use of the react-google-recaptcha packages which provide a React component for reCAPTCHA v2.
First, install the package into your program by running this command via your command line:
npm install react-google-recaptcha
# or
yarn add react-google-recaptcha
The react-google-recaptcha package provides a ReCAPTCHA component to be used, for instance, as such:
import ReCAPTCHA from "react-google-recaptcha";

function onChange(value) {
	// what happens when
  console.log("captcha value:", value);
}

ReactDOM.render(
  <ReCAPTCHA
    sitekey="The client site key from the Google reCAPTCHA admin console"
    onChange={onChange}
  />,
  document.body
)
The sitekey and onChange props are only necessary for the basic functionality of the ReCAPTCHA component but there are some optional props that can configure the appearance or the operations of the component. Some of the props :
sitekey: the client key from Google reCAPTCHA Admin ConsoleonChange: the function that is called when a user completes the captcha successfullytheme: (lightordark) sets the theme of the reCAPTCHA widgettype: (imageoraudio) defines the type of initial captchatabindex: the tabindex of the elementonExpired: the function that is called when a captcha has expiredsize: (compact,normal, orinvisible) allows you to define the size of the reCAPTCHA widget or do an invisible captcha.
Next, you will make use of the package in your program by updating the App component as such:
import React from "react";
import "./App.css";
import  ReCAPTCHA  from "react-google-recaptcha";

function App() {
  const [isCaptchaSuccessful, setIsCaptchaSuccess] = React.useState(false)

  function onChange(value) {
    setIsCaptchaSuccess(true)
    console.log("captcha value: ", value);
  }

  return (
    <>
      <form>
        <input id="username" name="username" placeholder="Username" />
        <input
          type="password"
          id="password"
          name="password"
          placeholder="Password"
        />
        <ReCAPTCHA
          sitekey={process.env.REACT_APP_RECAPTCHA_SITE_KEY}
          onChange={onChange}
          />
          <button disabled={!isCaptchaSuccessful}>Login</button>
      </form>
    </>
  );
}

export default App;
The isCaptchaSuccessful state is used to ensure the submit button is disabled until the captcha challenge is successfully completed.
As it is not recommended to validate only from the client side, you not only rely on the reCAPTCHA implementation on the client side. You can send the token derived from the
onChangeprops and verify it from the server side using Google’s reCAPTCHA server-side API. You can find more about this here.
create-react-app cannot bundle environment variables from the .env file at runtime so you need to rebuild the react app by ending the previous server you started and starting a new one with the command:
npm startThen the reCAPTCHA widget with a disabled submit button would be visible on your application as such:

Passing the challenge would make the button accessible as such:

Conclusion
At the end of this article, we discussed what reCAPTCHA is and how it can prevent your application from malicious bots or automated programs. You also demonstrated how to integrate reCAPTCHA into a React application.
I hope you find the article helpful to help you prevent your React applications from bots or malicious automated programs.