If you are working a project with more than 2 developers, you might note different formatting code create different kinds of issue like merge conflicts, code unreadable, etc. To avoid such cases, we can set up git hooks that format the code before the push into the remote server.
We are going to use several tools to add rules, create formats, and the tools to make them run when we committed the code.
1. Install Packages
- Linter: ESLint
Halodoc uses Typescript (Angular), so ESLint can find problems in our javascript and typescript files. A lot of problems found by ESLint can be corrected, more than that, we can customize the rules based on your needs of your company
Documentation: https://eslint.org/
- Code formatter: Prettier
Format the HTML, CSS, and TS file with the prettier rule. You will save time by not having to discuss style during code review.
Documentation: https://prettier.io/
- Git Hooks: Husky
Husky can improve our commits by using it to lint our commit messages and run ESLint and Prettier on pre-commit.
Documentation: https://typicode.github.io/husky/#/
- File stagger: Lint-staged
With this tool, husky only checks for the changes that developers made, so it does not contain all the files, only those that the developer made during the commit.
Documentation: https://www.npmjs.com/package/lint-staged
To install the packages, use:
npm install --save-dev eslint prettier lint-staged husky2. Configure ESLint
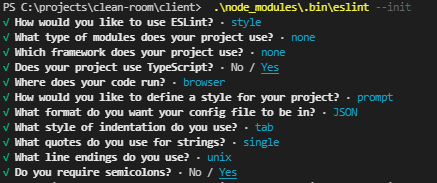
Run the following command to initialize ESLint:
npx eslint --initYou will be prompted to answer a few questions, from which the configuration for your specific use case will be generated
The generated configuration would look something like this:
{
  "env": {
    "browser": true,
    "es2021": true
  },
  "extends": ["eslint:recommended"]
}
If you are lazy like me, just copy and paste the configuration into a file called .eslintrc.json instead of answering the long list of questions.
To check out all the available configurations, visit the ESLint documentation. The config provided above is just a barebone example.
3. Configure Prettier
Configuring Prettier is similar to ESlint, just add a .prettierrc.json file to your project root and you are good to go.
You can use the following configuration as a starting point:
{
  "bracketSpacing": true,
  "semi": true,
  "singleQuote": true,
  "trailingComma": "all",
  "printWidth": 80,
  "tabWidth": 2
}
To check out all the available options, head over to the Prettier Documentation.
Also add a .prettierignore file to your project root to ignore files that you don’t want to be formatted, use the following content as a base:
package-lock.json
yarn.lock
node_modules
# any other unwanted files or folders
4. Configure Lint-staged
Lint-staged too is quite simple to configure. Just add the following to your package.json file and you are good to go:
{
  /* other configurations */
  "lint-staged": {
    "**/*.{js,jsx,json}": ["eslint . --fix", "prettier --write ."]
  }
}
5. Configure Husky
We are at the last peg of our configuration journey. Configuring Husky is a bit trickier than the other configurations. Add the following script to your package.json file:
{
  /* other configurations */
  "scripts": {
    /* other scripts */
    "configure-husky": "npx husky install && npx husky add .husky/pre-commit \"npx --no-install lint-staged\""
  },
  "husky": {
    "hooks": {
      "pre-commit": "lint-staged"
    }
  }
}
Run the configure-husky script to install Husky and connect it to the pre-commit hook:
npm run configure-huskyYou are now set! Let’s try committing some changes
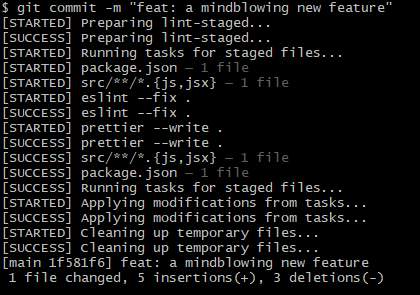
Whenever you commit the code lint-staged will run the prettier and those will format automatically. From now on, maintaining a consistent code style in your project will be a breeze.